How to Kinesiology Tape for Shoulder Pain

Shoulder pain and AC joint injuries are common in the sports industry. Such conditions are usually experienced as a result of a direct blow or fall on your shoulder.

Shoulder PainFortunately, after seeking medical assessment, there are various self-care treatments like Kinesiology Taping which can help support pain and normalize the function of the shoulder especially during the early stages of recovery.

In this article, we’re going to discuss about shoulder pain and show you proper kinesiology taping steps for this type of condition.

The Shoulder

The shoulder is a large and complex joint in the human body. It is made up of three major bones that meet to create a 90 degree angle:

  • Scapula
  • Clavicle
  • Humerus

Of which these bones’ junctions form three joints:

  • Acromioclavicular (AC) joint)
  • Sternoclavicular joint
  • Glenohumeral joint

The shoulder is vital for various actions of the arms and hands such as pulling, lifting , pushing, carrying, etc.

Kinesiology Taping for Shoulder Pain

Checkout this video by Physiotherapist and Kinesiology Taping expert Mr. Adam Collyer, on how to easily kinesiology tape for shoulder pain:

Guide in Kinesiology Tape for Shoulder Pain

First Tape Application:Kinesiology taping shoulder 1

  1. Measure the tape to run from just below the neck down across the arm to about the level of the mid-biceps. In measuring the tape, make sure that the arm is elevated to about 45 degrees. This is because in this type of injury, our aim is to decompress the AC joint and since we often use the arm in an elevated position – it would be best to elevate your arm at a certain degree.
  • Note: In measuring the tape, keep in mind that the tape will be longer when stretched.
  1. Cut the tape and trim the edges to ensure the tape wouldn’t easily peel off.
  2. Create an anchor tab, by folding a portion (about 1 ½ to 2 inches) at the edge of the tape, tearing along the fold line and then peeling the paper at the back.
  3. Elevate the shoulder to about 45 degrees then stick the anchor piece up on the shoulder, above the AC joint. Rub the anchor tab to let it stick effectively.
  4. With the shoulder still elevated, peel off most of the back tape leaving an inch of unpeeled tape. Line the tape along the AC joint, pull with about 50% tension then place it down over the arm. Pat and rub the tape to ensure it sticks to the skin and covers the shoulder effectively.
  5. Peel off the last piece then apply without any tension.

Second Tape Application:Kinesiology taping shoulder 2

  1. Measure another piece of tape which is going to cross the AC joint horizontally. Take note that the arm must still be elevated at about 45 degrees. Application is from back to front.
  2. Cut the corners off same as the previous application.
  3. Create the anchor tab and remove the paper at the back.
  4. Stick the anchor piece on the back of the shoulder.
  5. Peel off gently the remaining back tape and leave a small unpeeled portion at the edge.
  6. Pull with about 75% tension and then stick the tape over the AC joint.
  7. Finally, peel off the remaining back tape then stick without tension.


Shoulder Painshoulder pain

Shoulder pain refers to pain that is felt around or in the shoulder that is more pronounced when doing arm or shoulder movements. It can originate from the shoulder joint or from the tendons, ligaments or muscles surrounding it.

Possible Causes:

  • Fracture (Broken Arm/Shoulder bone)
  • Frozen Arm
  • Instability
  • Rotator Cuff Injury
  • Arthritis, Osteoarthritis
  • Bursitis, Tendinitis
  • Poor Posture

Treatment:

  • Rest and avoid activities that can aggravate the pain.
  • Painkillers (e.g. ibuprofen) and ice packs to help relieve pain and reduce swelling.
  • Physiotherapy
  • Kinesiology Taping
  • In some cases, surgery.

Got what you need?

If your answer is yes, please like and share this article so that others will learn about the benefits of Kinesiology Taping J Our goal at sportstrap.com.au is to educate and provide up-to-date and important information about the sports medicine industry. For your suggestions, comments and inquiries, please share them at the comments section below.


Kinesiology Tape Shin Splints Pain

How to Kinesiology Tape Shin Splints

At one time or another, we can’t help but experience shin splints, especially for athletes that run a lot on hard surfaces. In this article, we’ll educate you about shin splints, its causes, symptoms and treatments. We’ll also show you how to take advantage of Kinesiology Taping to relieve this painful condition of the shin.

The Shinshin bone

In human anatomy, the shin, otherwise known as tibia, shinbone or shank bone – is the larger of the two bones (the other one is the fibula) located in the lower part of the body. The tibia is also the second largest bone in the human body and its main function is to carry the body weight of a human.


Kinesiology Taping Shin Splints

Check this awesome video from the Dr K Series, featuring Physiotherapist and Kinesiology Taping Expert Adam Collyer:


What you shall need:Spider Tech Pre Cut Kinesiology Tape

*** Also use Spider Tech Pre Cut Kinesiology Tape

 Guide in Kinesiology Taping for Shin Splints

Kinesiology taping can help by supporting and decompressing the overloaded muscles and the painful tissues around the affected area.

  • First Tape ApplicationKinesiology Taping Shin1
  1. Step 1 – Measure the tape starting from the bony bump on the outs ide of the foot then around the sole of the feet then halfway up the shin. Keep in mind that the tape will be longer when stretched.
  2. Step 2 – Cut the tape, then round the edges to avoid peeling off.
  3. Step 3 – Set the anchor tab by creating a little fold at the edge then tearing along that fold line. Peel the back tape to finally create the tab.
  4. Step 4 – Stick the tab on that little bony bump on the outside of the foot. From there, bring the tape down the sole of the foot then peel back some to expose the tape to stick down without using any actual tension.
  5. Step 5 – From the sole, peel the tape most of the way up, leaving an inch or more of unpeeled tape. Coming around the corner then aim to run the inside of the shin up applying 50% of tension.
  6. Step 6 – Lastly, peel of the edge of the tape and stick without any tension.
  7. Step 7 – Give the tape a good rub to ensure it sticks properly.
  • Second Tape ApplicationKinesiology Taping Shin2

Depending on the type or areas of pain, you can create one or more horizontal pieces to allow more decompression. So let’s say the pain is at the lower third of the shin, here’s what you should do:

  1. Step 1 – Measure the tape crossing the lower third of the shin. Cut the length then trim the corners.
  2. Step 2 – Doing center tape application, tear the middle of the tape.
  3. Step 3 – Pull the corners back real tight, applying around 75% tension and stick it down over the painful area.
  4. Step 4 – Leave the edges free and stick it without any tension. Give the tape a rub to finish.

Shin Splints

Shin splints, also known as medial tibial stress syndrome (MTSS), are injuries along the shin pain
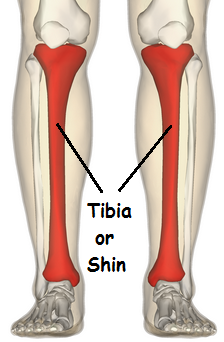
shinbone that causes pain. Although the exact injury is not known, shin splints seem to result from the inflammation of the tendons, muscles and bone tissues of the shin. Shin splints are most common among runners and dancers.

Causes:

  • Repetitive stress on the shinbone and the tissues and tendons attaching the muscles to the bones. (ie excessive running on hard surfaces)
  • Stress fractures of small breaks in the lower leg bones
  • Swollen muscles
  • Sudden increase in the intensity/distance of workouts
  • Flat feet
  • Over pronation
  • Excessive stress on one hip or leg when running

Signs and Symptoms:

  • Dull ache, soreness and tenderness along the inner part of your lower leg.
  • Mild swelling in the lower leg.
  • With continuing workout, pain may become so intense that one would stop the workout all in all.

 Treatments:

  • Take a rest and stop activities which could cause shin splints.
  • Use ice packs to the affected area.
  • Take medicines like ibuprofen, paracetamol or naproxen to relieve pain and inflammation.
  • Apply kinesiology taping techniques to help ease pain and swelling.

Did we help you?

Educating and giving you usable and up-to-date information and news in the field of sports medicine is our major purpose. We hope we were able to provide you the information you need in our article above on how to effectively kinesiology tape shin splints . If we were able to help you, liking and sharing the article is very much welcome!!! For comments and suggestions for future posts and information you want us to discuss, please leave them in the comments box below J


Kinesiology Tape a Corked Thigh

Kinesiology Tape: How It Works

Kinesiology tape is gaining popularity not only among athletes but also among ordinary people. You might have seen it being worn by basketball players, gymnasts, runners, cyclists and olympic athletes. It’sthe beige, black, pink or blue-colored tape that looks so cool and trendy on their skin.

But really, what is Kinesiology tape all about?

How does it work?

Here’s another video from the Doctor K series, with Kinesiology taping expert Adam Collyer, from MCPhysio, talking about how this tape works.

How Can Kinesiology Tape Help You?

Kinesiology tape can help you in:

1. Removing lymphatic fluid congestion

How Kinesiology Tape Works

Once applied to an injured area, kinesiology tape pulls the skin’s upper layers, creating some space between the muscle and the skin.

That space eases the pressure to the lymph channels, allowing lymphatic fluids to flow more freely.


2. Relieving pain

How Kinesiology Tape Works

Kinesiology tape also reduces pressure on pain receptors that change how your brain and body respond to pain.

These small receptors stimulate the nerves in your skin. Those nerves consequently send messages to your brain that everything is alright.


3. Speeding up the healing process

How Kinesiology Tape Works

On the other hand, kinesiology tape’s properties also assist an increased healthy blood flow through the application area.

This enables the blood to carry oxygen and other nutrients to the injured area, causing it to heal faster.


4. Reducing Swelling and Bruising

Kinesiology Tape a Corked Thigh

Do you see the wave-like pattern on the adhesive side of the kinesiology tape? It’s there for a purpose – to gently lift the skin from the muscle in order to create a miniscule space in between.

This reduces the swelling and facilitates the healing of bruises.


5. Supporting muscles in movement

Hamstring Kinesiology Tape

How can such a tape support muscles?

It all boils down to the shape used in the application and the variety of tension strengths. Think of this application as a reinforcement of your anatomy.

You follow the natural curvature of the muscle involved, surround it with some tape so that when it pulls back, the muscle underneath contracts as well.

Thus, the muscle is supported and receives minimum stress. Perfect for people with weak muscles or those who are recovering from injuries.


6. Correcting joint misalignment

Elbow Kinesio Tape

Yes, Kinesiology tape can correct joint misalignments.

To make this application work, you need to balance the various structures that are tugging at the joints.

The aim is to balance the different structures pulling on the joint.

This may require facilitating one muscle and inhibiting another.

It may also require a correction to the joint itself to hold it in place for proper alignment. This will vary by joint and the underlying pathology.


7. Relaxing injured muscles

Back Kinesiology Tape

Athletes, specifically, are prone to muscle injuries due to the great deal of stress that they have to deal with on a frequent basis and the quick, abrupt movements they make.

Kinesiology tape, when applied to an injured muscle, restricts its movement, and supports it during activity.


8. Preventing recurrences

ankle

Resting, icing, compressing and elevating only provide relief to an injury.

Unattended, these injuries may recur anytime. Proper application of Kinesiology tape not only relieves pain and inflammation.

It can provide the right condition for faster complete healing, and even providing protection against re-injury to the affected area.

So, if you or any of your loved ones need relief from pain or help in recovering from injuries, consider using Kinesiology Tape. It might just do its wonders for you.


Did this Article Help?

Is this article and video helpful? Do you have any questions, comments or suggestions? Please write whatever you have in mind in the comments below.

Have a most outstanding day,
Cade Arnel